
Breast pumps can be a total game changer for nursing moms. But to be honest, they can also be a bit overwhelming at first when you’re not sure what’s what. With so many parts that all need to work together, it’s really important to understand how each part functions to help you express milk effectively.
Whether you’re cleaning your breast pump, swapping out worn pieces, or assembling it for the very first time, knowing how to properly put it together is very important. In this post, I’ve put together a complete guide on how to put together breast pump parts so you can get the most out of every pumping session.
How to Put Together Breast Pump Parts
Before we dive into the assembly of the breast pumps, you need to first understand what you’re working with. Understanding the individual parts of the pump will help you follow the guide more easily and ensure that each component is functioning properly. You can also check out my full video here on all the basics of your pump parts!
What Are The Parts Of A Breast Pump?
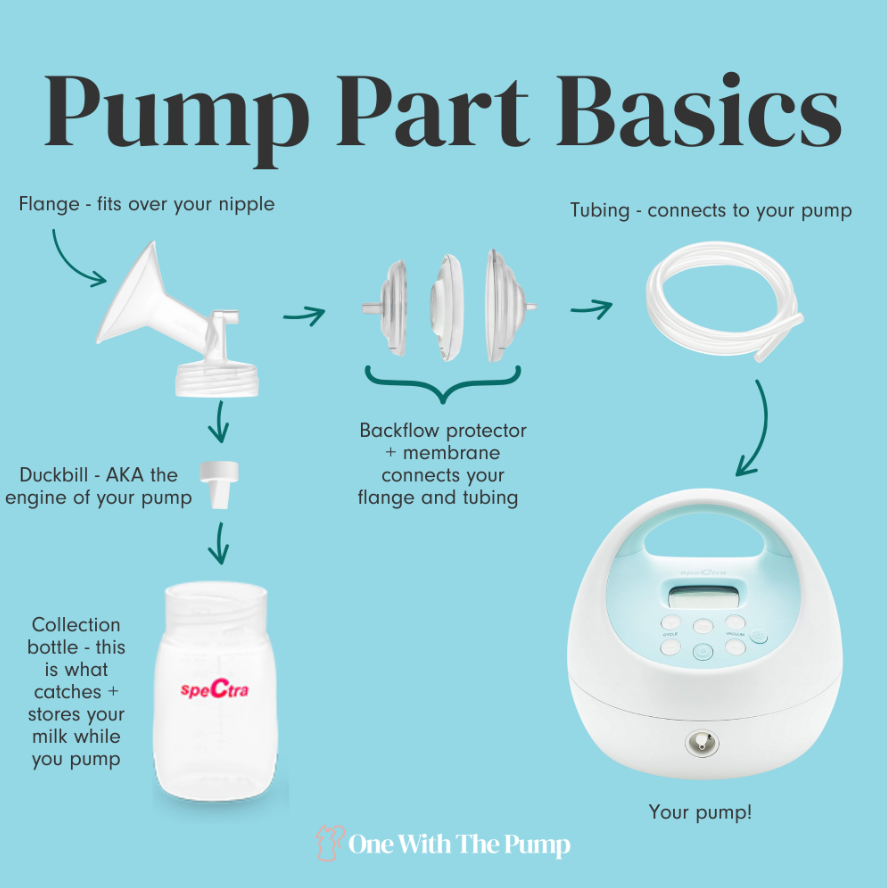
Flange
This cone-shaped piece fits directly over your nipples and creates a seal around the breast. The size of the flange can greatly affect your comfort and milk output. It’s important to make sure you’re using the correct size. If you need help figuring out which size is the best for you, use my FREE Flange Ruler.
Valve
The valve helps control the suction of the milk flow from the breast into the bottle. It’s usually made from silicone and very prone to wear over time. It’s important to inspect them often.
Membrane
Attached to the valve, this thin and flexible piece is important for creating suction. If it’s torn or stretched, your pump won’t suction as well.
Connector
The connector attaches the breast shield to the collection bottle and tubing. Depending on the pump model, they may be a single-piece or multi-part component.
Tubing
The tubing links the breast pump motor to the breast shield or connector, allowing plenty of suction to be delivered. Tubing needs to stay dry, because if moisture gets in, it can impact the performance of the pump and harbor bacteria.
Collection Bottle
The collection bottle screws onto the bottom of the breast shields and collects the milk. These bottles often double as storage containers and come with caps or sealing discs.
Backflow Protector
Not all pumps have one of these, but they’re designed to keep milk from flowing back into the tubing or motor, protecting the pump and your precious liquid gold.
Do You Need To Replace Breast Pump Parts?
Yes, over time and with regular use, parts can wear down and become much less effective. Most experts recommend replacing breast milk pump parts often to achieve the best performance and hygiene standards. Replacing parts can also help to improve suction strength and comfort during pumping. If you notice a drop in milk output or hear odd noises from the motor, it could be a sign that it’s time to switch out a few parts.
What Breast Pump Parts Need To Be Replaced & How Often To Replace Breast Pump Parts
Here’s a handy little guide to help you know when it’s time to replace your key breast pump components:
- Valves: Every 1-3 months
- Membranes: Every 2-3 months
- Tubing: Every 3-6 months or immediately if loose or moldy
- Breast Shields: Every 6 months or sooner if they become misshapen
- Backflow Protectors: Only when cracks are present
- Connectors: Every 3-6 months
How To Assemble A Breast Pump After Replacement
- Step 1: Attach the membrane to the valve: Snap or slide the membrane onto the valve until it’s secure. Make sure it’s lying flat and isn’t bent or curled.
- Step 2: Insert the valve into the breast shield or connector: Push the assembled valve into place at the bottom of the breast shield or connector.
- Step 3: Connect the breast shield to the collection bottle: Screw the bottle onto the bottom of the shield or connector until it’s tight, but make sure you don't over-tighten it.
- Step 4: Attach the tubing: Insert one end of the tubing into the motor part and the other end into the back of the connector or shield, depending on the pump model you have.
- Step 5: Add the backflow protectors (if you have one): Install the backflow protector between the tubing and the connector if your pump uses one.
- Step 6: Double-check everything before you start: Finally, before you start pumping just make sure all connections are snug, the membrane is in place, and the tubing is dry and free of cracks.
You don’t need to be confused about breast pump parts!
Breast pumps can seem complicated at first, and it’s totally normal to feel a bit overwhelmed. Once you know how each part works and how to assemble them properly, the process will become second nature. Remember, properly maintaining and replacing your pump parts is super important for getting the best performance and the most liquid gold.
If you’re still unsure what pump to use, check out this guide on the different types of breast pumps. If you’re just starting your pumping journey or would like some more information backed by professionals, check out The Ultimate Pumping Course, where you can find unlimited information that will help you enjoy stress-free pumping, from the first feed to the last!

